IPAM on Windows Server
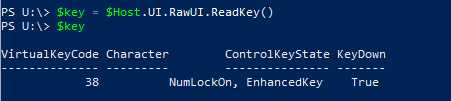
Listen For KeyPress Using PowerShell
12/15/2020
Modify Group Policy Refresh Interval for Windows Computers
03/02/2021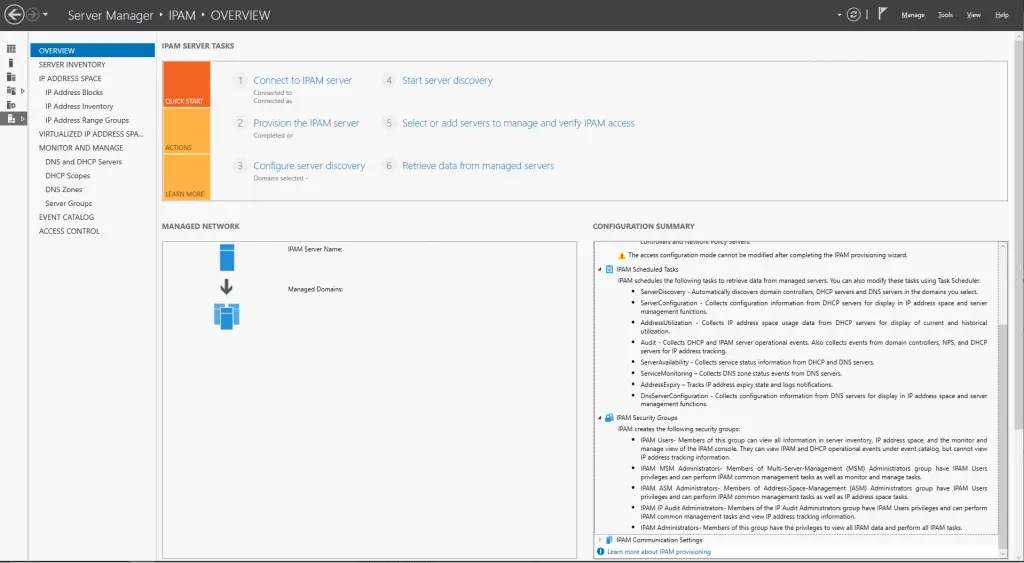
Recently I was asked to setup IPAM on a Windows Server services on a server already running IIS services. Here is the process I took to setup and configure.
What is IPAM & what does it do?
The Microsoft IP Address Management (IPAM) is an integrated suite of tools to enable end-to-end planning, deploying, managing and monitoring of your IP address infrastructure, with a rich user experience. IPAM automatically discovers IP address infrastructure servers and Domain Name System (DNS) servers on your network and enables you to manage them from a central interface.
Maintaining an updated list of static IP addresses that have been issued has often been a manual task, which can lead to errors. To help organizations manage IP addresses, Windows Server 2016 provides the IP Address Management (IPAM) tool.
IPAM enables the administration and monitoring of DHCP and DNS and provides a comprehensive view of where IP addresses are used. IPAM collects information from domain controllers and Network Policy Servers (NPSs), and then stores that information in the Windows Internal Database.
My Checklist:
- Is this server a Domain Controller?
- Version is newer than 2012?
- Is this server a DNS server?
- Server also a DHCP server?
- Is the Server is not running NPO
- What Other services is the Server currently running? ___________________
- Is Server a VM?
- Server is joined to the domain
Instruction:
Login to the domain member server, in our case web1.sfb.osaa.net.
Open Server Manager if it does not auto pop up.
Click on Add Roles & Features.
With the Add Roles and Features Wizard, Click Next.
Select Role-based or feature-based installation.
Under Server Selection, Select Select a server from the server pool, and make sure your server is selected that you want to install it on. When ready click Next.
Under Server Roles we do not select anything, rather just Click Next.
IPAM on Windows Server
Note: The image above I have already installed IPAM on the server..
Under Features we select IP Address Management [IPAM] Server Check Box.
Continue with Next.
On the Confirmation screen verify the data is accurate and click Install.
When the installation progress has completed you can close the interface window.
In the Member Server, on the Server Manager click on IPAM.
Next we are going to Click on Provision the IPAM server.
In the Provision IPAM Wizard interface, on the Before you begin page, make sure to read this page and when completed, click Next
On the Configure database interface, leave the default Windows Internal Database (WID) selected, unless you know your Microsoft SQL settings, then add them. When completed, click Next
On the Select provisioning method interface
You need to ensure that Group Policy Based is selected. Now you can setup every server manually, then in the GPO name prefix box, type IPAM_DOMAIN, and then click Next
On the Confirm the Settings interface, click Apply
Note: Provisioning is not a fast process, it will take a few minutes to complete
Click Close once provisioning is complete
On the IPAM Overview interface, click Configure server discovery
In the Configure Server Discovery settings box, click Get Forest. This process sometimes requires you to close this window and open it again to see the changes. Once you do see the domain in the list. then click Add (verify that you add the correct domain)
On the Configure Server Discovery box, confirm that Domain Controller, DHCP Server, and DNS Server is selected and then click OK
In the IPAM Overview interface, click Start server discovery
NOTE: Discovery may take a while…
After a few minutes, the yellow bar will indicate that the discovery is completed
Back at the IPAM Overview interface, click Select or add servers to manage and verify IPAM access
The newly provisioned IPAM server’s Access status is blocked?
Note: This also indicate that IPAM server has not yet been granted permission to manage the domain server via Group Policy
Next we will use PowerShell for provisioning the IPAM GPO. Per Server.
The command is:
Invoke-IPAMGpoProvisioning -Domain domain.net -DomainController DC1.domain.net -GpoPrefixName DC1_IPAM -IpamServerFqdn WEBSERVER.domain.net -DelegatedGpoUser ADMINACCOUNT
At the prompt to approve select Yes. No to any other prompts that might happen to popup.
Next
In the SERVER INVENTORY. Under the IPv4 pane, right-click DCSERVER, and then click Edit Server
As you can see in the above image I have already added two of our domain controlling servers to Managed. Starting from scratch in the Add or Edit Server box, set the Manageability status to Managed, and then click OK
IPAM on Windows Server
On each Domain Server run gpudate /force command to update the IPAM GPO
Next, in the IPAM console, right-click on the domain controlling server, and then click Refresh Server Access Status
Note: It may take up to 10 minutes for the status to change
Refresh tasks as needed until a green checkmark displays next to DCSERVER and the IPAM Access Status shows Unblocked for the server. If it does not after a substantial time, Edit Server, and remove DNS as an option, add it back after refresh.