Containing Your Game Servers – Building Minecraft Servers Using Docker.
Randomly Generate a Passphrase Using PowerShell
03/08/2021Writing an install.sh. Scaling a LAMP install.
05/18/2021
In this guide we walk you through Containing your game servers by building Minecraft servers using Docker. This assumes you know how to install Ubuntu and get to a terminal window.
What is Docker you ask?
Docker is an open platform for developing, shipping, and running applications. Docker enables you to separate your applications from your infrastructure so you can deliver software quickly. With Docker, you can manage your infrastructure in the same ways you manage your applications.
Docker
Once you logged into your new install, open a Terminal window.
You are going to use sudo a lot. Start by typing:
sudo -i
The above command will save you a considerable amount of time.
Install all the other things we will need later on.
First we will update the apt package index
sudo apt-get update
Next, we list out a few applications we want to make sure we have available to us.
sudo apt-get install \
     apt-transport-https \
     ca-certificates \
     curl \
     gnupg \
     gnupg-agent \
     software-properties-common \
     nano \
     lsb-release
Now that the staging is completed let’s move on to more fun stuff. Security.
Secure OS:
I will preface this with this is not an all encompasing guide to hardening a Ubuntu server, just basics. That said, let’s start.
Initially, we want to make sure the device we are using is as secure as possible as this will be facing the internet, and the internet is not a safe place. We will start by creating a new user. This user can be named any name you like as long as it is lowercase, starts with a letter, and all one word. For instance:
adduser SuperAwesomeAdmin
Afterwards you need to set the password for the new account.
passwd SuperAwesomeAdmin
Add the user to the sudo group so you’ll have administrative privileges
adduser SuperAwesomeAdmin sudo
Listen to only one internet protocol
By default the SSH daemon listens for incoming connections over both IPv4 and IPv6. We do not want to do this anymore. The more connections to the internet the more chances nefarious users will attempt access.
Options are:
AddressFamily inet6 to listen only on IPv6.This is why nano was installed, ease of use. You can also use vi/vim/emacs if you prefer.
sudo nano /etc/ssh/sshd_config
Note: This does not disable the protocol system-wide, it is only for the SSH daemon and will only allow connections to and from the SSH daemon using the protocol specified.
Find the below line and delete the #. This uncomments the line.
# Port 22 AddressFamily inetOnce you finished typing disable above; Hold keys CTRL+X, at the prompt type the letter Y. Lastly hit the Enter key to complete the process and save the file.
Limiting SSH Daemon Options
- We want to deny root login over SSH. What this does is tell the SSH Daemon to disallow, or deny access to SSH protocol. This is the reason for creating the new account and making it an administrator was in preparation for this.
Type, again:
sudo nano /etc/ssh/sshd_config
Find the line that reads:
# Authentication: ... PermitRootLogin noTake out the # in the beginning of the line.
Find the line that reads:
Change no to disable.
Once you finished typing disable above; Hold keys CTRL+X, at the prompt type the letter Y. Lastly hit the Enter key to complete the process and save the file.
Uninstall listening services
sudo apt purge package_name
sudo systemctl restart sshd
The sudo in the beginning of the command is only needed if you did not use sudo -i in the beginning.
Containing Your Game Servers – Building Minecraft Servers Using Docker.
To install updates type:
sudo apt update && sudo apt upgrade -y
#remove packages that are no longer needed
sudo apt autoremove
Again, the sudo in the beginning of the command is only needed if you did not use sudo -i in the beginning.
Install Docker
Now the more fun part, we get to install and configure Docker!! This guide assumes this is a fresh install. If you are uncertain, uninstall any potentially previously-installed packages.
sudo apt-get remove docker docker-engine docker.io containerd runc
If the apt-get service indicates that no packages were found, continue to the next step.
Add the official Docker GPG repository key.
sudo curl -fsSL https://download.docker.com/linux/ubuntu/gpg | sudo apt-key add -
Add the official Docker upstream repository.
sudo add-apt-repository "deb [arch=amd64] https://download.docker.com/linux/ubuntu $(lsb_release -cs) stable"
Update the apt package cache.
sudo apt-get update
Install the required Docker packages.
sudo apt-get install docker-ce docker-ce-cli containerd.io
Start and enable the Docker daemon.
sudo systemctl enable --now docker
Confirm that you can run docker commands. The following command should return without errors and show zero running containers.
sudo docker ps
Docker is now installed, to test completely type the following:
docker run hello-world
You should get output that resembles the following:
Hello from Docker!
This message shows that your installation appears to be working correctly.

To generate this message, Docker took the following steps:
 1. The Docker client contacted the Docker daemon.
 2. The Docker daemon pulled the "hello-world" image from the Docker Hub.
    (amd64)
 3. The Docker daemon created a new container from that image which runs the
    executable that produces the output you are currently reading.
 4. The Docker daemon streamed that output to the Docker client, which sent it
    to your terminal.

To try something more ambitious, you can run an Ubuntu container with:
 $ docker run -it ubuntu bash

Share images, automate workflows, and more with a free Docker ID:
 https://hub.docker.com/

For more examples and ideas, visit:
 https://docs.docker.com/get-started/
Install Docker Compose
sudo curl -L "https://github.com/docker/compose/releases/download/1.28.5/docker-compose-$(uname -s)-$(uname -m)" -o /usr/local/bin/docker-compose
Apply executable permissions to the binary:
sudo chmod +x /usr/local/bin/docker-compose
Test the installation.
$ docker-compose --version
Should look like the below screenshot:

Installing Portainer Server.
Pull the image from Official Docker
docker pull portainer/portainer
Create a new volume for portainer.
docker volume create portainer_data
Start Portainer Container with extreme prejudice
docker run -d -p 8000:8000 -p 9000:9000 --name=portainer --restart=always -v /var/run/docker.sock:/var/run/docker.sock -v portainer_data:/data portainer/portainer-ce
Containing Your Game Servers – Building Minecraft Servers Using Docker.
Pull Java Minecraft image from Official Docker
docker pull itzg/minecraft-server
Pull Bedrock image from Official Docker
docker pull itzg/minecraft-bedrock-server
We are almost there. Now we need to make note of our outside IP address. To connect to. In order to list the IP’s the system currently has we type
ifconfig
The output looks similar to this:

We want the eth0 – inet address in this case. As a side note the devices that start with veth are the docker containers
Now we can start the servers:
Bedrock server. This below command is mine I use when starting a new bedrock server for Xbox, Playstation, Switch, iPad, iPhone, Android, Amazon FireHD, and PC.
docker run -d -it -e EULA=TRUE --name mcs -e SERVER_NAME="BedrockMC NoSEED" -e GAMEMODE=survival -e ONLINE_MODE=false -e difficulty=normal -e spawn-npcs=true -e spawn-monsters=true -e spawn-animals=true -p 19132:19132/udp itzg/minecraft-bedrock-server --restart always
Java Server. So you want to run the way Minecraft was intended? No bedrock for you good sir. You are elite. In that case this is the command I use to start up my docker container for Java.
docker run -d -p 25565:25565 --restart always --name mc -e SERVER_NAME="JavaMC NoSEED" -e EULA=TRUE itzg/minecraft-server
Now that everything is installed let’s check out our containers using the command:
docker ps
The output should resemble:

If you see all three we can now load up Portainer. Type in the IP address we noted earlier and add :9000 to the end. Then paste it in a browser.
Your initial page will be the setup of an administrator account. I suggest you do not make your administrator named administrator, but get creative.
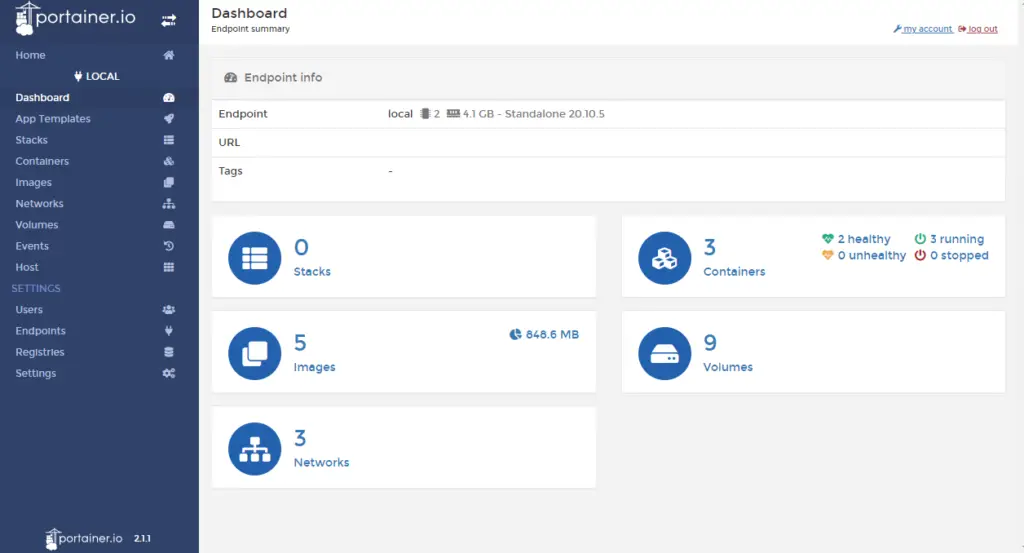
Once you create the account and verify the password your next screen is below:

Click on the Containers button:

Once you see all of your containers running healthy you are all set to jump into your server and start having fun.
Add the IP and default port to the server connection:
Bedrock:

Java:

That is all there is to it. Enjoy!
